Beginner Walkthrough
Walkthoughs Home
Signing In
Without a username and password, you will not be able to do much.
These can be obtained by requesting a demo account or subscribing
to WebSBA. More...
- Go to www.websba.com and click on User Login.
- Once inside the application, click the Sign In link in the upper-right corner of the page.
- Enter the username and password you have been given and sign in.
Entering Your Company Information
After you are logged in, you should setup your company information.
This includes your company name, address, phone number, and other
data which will appear on your invoices and other documents.
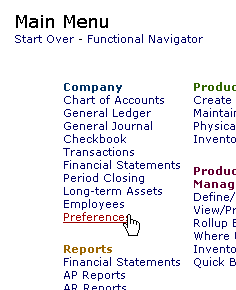
- Verify that you are at the Main Menu. (Clicking the WebSBA logo will always take you there.)
- Click Preferences under the Company module.
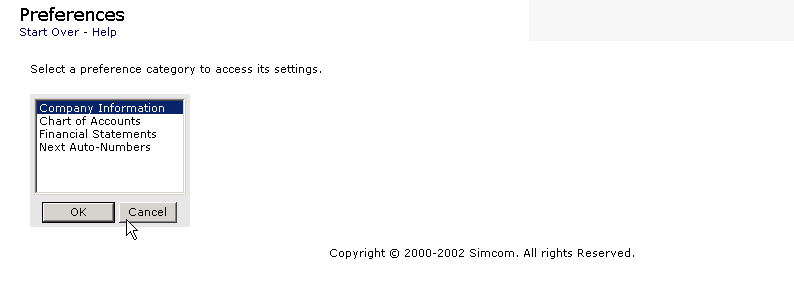
- Select the Company Information option and click OK.
- Enter your company information in the displayed form and click OK.
Creating a Product
Before you can buy and sell an item, you must define its "Product Record."
- Return to the Main Menu. (Clicking the WebSBA logo will always take you there.)
- Click Create New Products under the Products module.
- Enter a Product Name and Unit Price and click Save Product.
- You will receive confirmation that your new product has been created.
Creating a Supplier
Before you can purchase products for your inventory, you must create a supplier.
- Return to the Main Menu. (Clicking the WebSBA logo will always take you there.)
- Click Create New Suppliers under the Suppliers / Purchase Orders module.
- Enter a Supplier Name and any other data you have. Click Save Supplier.
- You will receive confirmation that the new supplier's record has been created.
Purchasing Inventory
Inventory is obtained from suppliers by creating and receiving purchase orders.
- Return to the Main Menu. (Clicking the WebSBA logo will always take you there.)
- Click Create Purchase Order under the Suppliers / Purchase Orders module.
- Click Search to display the supplier you created previously.
- Select the supplier and click Select Supplier.
- You will now see an empty purchase order. Click Search to display the product you created previously.
- Click the radio button next to your product and click Add Item.
- Click Save Order.
- You will receive confirmation and several further options. Click Receive Order.
- Your purchase order is now shown. Notice that you have received 0 units of your product. Change the 0 to 1 to receive the 1 unit ordered.
- Click Receive Order.
- You will receive confirmation that the receipt was completed.
- Click the Make Payment link.
- Review
the payment information and click OK.
- Enter a check number and select a bank account. Click OK.
Creating a Customer
Before you can sell your products and/or services, you must create a customer.
- Return to the Main Menu. (Clicking the WebSBA logo will always take you there.)
- Click Create New Customers under the Customers / Sales Orders module.
- Enter a Customer Name and any other data you have. Click Save Customer.
- You will receive confirmation that the new customer's record has been created.
Selling Products and/or Services
Products and services are sold to customers by creating and invoicing sales orders.
- Return to the Main Menu. (Clicking the WebSBA logo will always take you there.)
- Click Create Sales Order under the Customers / Sales Orders module.
- Click Search to display the customer you created previously.
- Select the customer and click Select Customer.
- You will now see an empty sales order. Click Search to display the product you created previously.
- Notice that you have 1 unit available. Click the radio button next to your product and then click Add Item.
- Click Save Order.
- You will receive confirmation and several options. Click Invoice Order.
- Click OK when asked to confirm the operation.
- Your sales order is now shown. Notice that you are about to invoice the 1 unit ordered.
- Click Create Invoice.
- You will receive confirmation that the unit was invoiced.
- Click here to go back to www.websba.com
Summary
You have now completed a simplified business cycle. Several other Walkthrough
tutorials covering more advanced features are accessible from the Walkthroughs Home.
Click here to go Back to www.websba.com and click on User Login
Copyright © 2002 Simcom. All rights reserved.